- Official BOC UK Online | Industrial Gases | Products & Solutions | BOConline UK
-
Shop
- Industries
- Processes
- Gases & Equipment
-
Solutions
-
Services
-
Health & Safety
-
Contact & Support
- What's Happening
-
Net Zero Strategies
Get Set to Weld: How to Set Up your MAG Welding Machine
Posted by BOC

If you want to weld safely and efficiently and get the best results, you’ll need to set up your welding machine correctly.
When MAG welding, there are several key aspects of welding machine operation to get to grips with. In the main these are wire-feed speed which controls current and voltage. Running trial welds is a sensible approach to assist with obtaining the optimum settings when adjusting these important variables, to ensure a sound weld is produced.
Why wire speed matters
Measured in metres per minute, wire feed speed is critical to achieving a satisfactory weld deposit as it controls the amperage when MAG welding. The wire speed and characteristics, such as wire diameter, must be right for the base material you’re working with.
Welding machines feature controls to set your wire speed so you should find it quite straightforward to adjust the speed to suit your welding task.
The importance of voltage
You should also pay attention to the welding voltage on your welding machine.
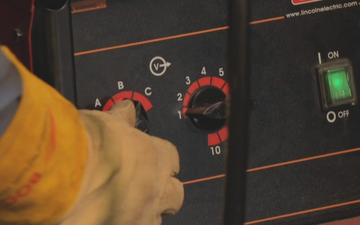
Some power sources allow you to set the Voltage. These "constant voltage" power sources are generally used for automatic and semi-automatic welding processes (GMAW, FCAW). With this type of power source, the voltage is set with a knob on the machine, and the amperage is regulated by the wire feed speed of the wire feeder. This is so because, with a small change in voltage, there is a very large increase in amperage. By speeding up the wire feed, the arc length is shortened, leading to a slightly lower voltage which leads to a much higher current. This higher current then burns off more wire.
We can see that this is a "self-regulating" system, preventing the wire from "stubbing" into the work piece. There are obviously limits to this. What complicates the voltage and amperage (wire feed speed) settings on this type of power source is that you can move between different "transfer modes" depending on your voltage, amperage and gas used as shielding, in the case of GMAW. Welding voltage primarily controls the arc length, which is the distance between the molten weld pool and the wire filler metal at the point of melting within the arc. As the voltage is increased, the weld bead will flatten out more and have an increasing width-to-depth ratio.
Use a voltage that’s too low and the wire won’t be sufficiently fused to produce a good weld. However, choose a voltage that’s too high and the welding wire is likely to overheat – also giving poor results.
Some power sources will only allow you to set the Amperage. These "constant current" power sources are typically used for manual welding processes (GTAW, SMAW). With this type of power source, the voltage is a function of the arc gap. The longer the arc, the higher the voltage. As such, you cannot "set" the voltage. It is a function of the welder technique.
The relationship V=IR (Ohm's law, where V = voltage, I = current, and R = resistance) holds across the arc but does not hold for the power source itself. With this type of power source, when the voltage is changed by the welder varying the arc length, the amperage does not change linearly as is given by Ohm's law. Rather, the amperage will only change slightly with a change in the voltage. Hence the name “constant current”.
Getting your welding machine ready
Now you’ve considered your wire feed speed (current) and voltage, it’s time to move on to preparing your welding machine.
This can be divided into several stages, each of which is crucial to achieving a good outcome:
1. Secure the wire feed – Ensure the wire feed rollers on your machine are set correctly for the wire diameter and type of wire you’re going to use. This can be done by using your fingers to tighten the wire retaining nut until the wire is firmly but not overly held in place. Guide the wire through the wire feeding mechanism – the wire will emerge and is then fed into the liner of wire feed hose, which connects the wire feeder unit to the torch.
Finally, engage the wire feed rollers, which should be set at a satisfactory tension. To begin the wire feed, use the internal switch on your machine or the trigger that you can find on the handle of your torch.
2. Check cover and cable – Next, check the wire cover on your machine is closed and that nothing is stored inside. This step increases safety while also helping to ensure your wire doesn’t get contaminated with dust and oil from the engineering process.
Make sure the return lead is attached to the item being welded or, alternatively, attached to the work bench. The torch umbilical should be as straight as possible so that the welding wire feeds smoothly while you work.
3. Set the wire length – Aim for 10x the diameter of the wire (e.g., for 1mm wire, a stick out of 10mm is a good guide). This will allow you to see the weld being deposited as you conduct the weld, and also boost the effectiveness of the shielding gas.
Running a test weld
As good as modern welding machines are (and as confident as you may be in your welding skills) trial and error is often the only way to achieve a perfect weld.
That’s why practice, in the form of a trial weld before you begin the real task you want to complete, is recommended.
Here are some things to consider:
- Use a piece of metal similar to the one you will actually weld, to help get the right settings and come to terms with the conditions
- Tweak the wire feed speed (current) and voltage while you run your test weld to achieve optimum results
- Whilst welding, watching out for low wire speed causing the weld deposit to overheat. Be wary too of high wire speed, which can leave behind a stringy appearance and spatter.
Once you’re happy with the results of your test weld, and everything else on your machine is set up correctly, you’re good to go. You can now save your settings and move on with confidence to your full welding job.
You can find out more about this topic in our video ‘An Introduction to MAG Welding - Setting Up Your Welding Machine’
Please note: cookies must be enabled to view the video. If you do not see the video, please click on ‘Cookie Settings’ and enable Cookies in your browser.
For more practical MAG welding tips, check out our video series.
With a wide range of options available, you’re sure to find the perfect welding machine to meet your specific needs on our online shop.

