- Official BOC UK Online | Industrial Gases | Products & Solutions | BOConline UK
-
Shop
- Industries
- Processes
- Gases & Equipment
-
Solutions
-
Services
-
Health & Safety
-
Contact & Support
- What's Happening
-
Net Zero Strategies
How to Assemble your Welding Kit
Posted by BOC

If you’ve been reading our series on common welding issues, you’ll know that sometimes the smallest things can make the biggest difference to the quality of your welds. The same goes for your welding kit. Get the basics right and your welds will be better, and your workplace safer. In this blog, you’ll find everything you need to create the perfect conditions for a good weld.
1. Getting your kit together
Select the right equipment for first time, high-quality results.
Consumables
Welding wire: Ensure you choose the right type and diameter of wire for your metal type and thickness. If your wire is too small, or too big, you’re less likely to achieve a strong weld because the heat won’t transfer correctly. As a guide, for mild steel thicknesses between 1.6mm – 6mm, you’ll need a 1mm wire diameter. Greater than 10mm mild steel thickness requires a 1.2mm wire.
Contact tip: The contact tip carries the current to your wire, so it’s crucial to achieving a good result. The size of your contact tip is linked to the size of your wire, so make sure these match up—and if your contact tip is worn, it’s time for a replacement.
Regulators and gas flow tools
Regulator: Your regulator should be specifically designed for the gas type and pressure you are using and should be less than five years old. Before fitting, check the cylinder valve outlet for any contamination.
Leak detection fluid: When your cylinder and regulator are turned to the correct pressure, you can spray leak detection fluid around all the gas connections/joints to check for leaks. The fluid will bubble if any leaks exist and will require depressurisation and retightening of the regulator or effected joint.
Peashooter flow meter: Making sure your gas flow rate is right is critical. Too little flow and your molten weld pool won’t be shielded. Meanwhile too much will cause turbulence and entrainment of air. A peashooter flow meter can be bought for around £15. Placed over your MIG or TIG gas nozzle, it will quickly and easily measure your flow rate.
2. Making sure you are welding safely
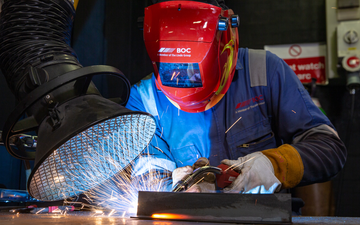
Of course, you can’t start to weld until your environment is safe and you are wearing the right PPE. Here’s everything you need.
Boots: These should have reinforced steel toe caps as a minimum. Some of the better welders’ boots have extra cushioning for comfort and are fire retardant.
Overalls and gloves: Fire retardancy is critical. For your overalls, this means making sure they’re the right fit and are made from approved flame-retardant material. Welding gloves should be leather instead of cotton and fit snugly, with room for movement.
Welding helmet: Your welding helmet is a critical piece of kit and it’s worth investing to get the best possible protection. It should be approved to EN175 and E379 standards and should fit comfortably. The better helmets allow you to adjust the darkness of the lens for the environment you are working in.
Flame retardant head protection: It’s important that no skin is exposed when you’re welding. Flame retardant head protection should be worn under your helmet.
A note on fumes
Welding has been found to cause cancer, so by law, you must complete a risk assessment to protect yourself and anyone else welding in your environment. HSE has issued guidance on controlling the risks from welding fumes which you can access from www.hse.gov.uk.
3. Additional kit and pre-weld tips
A cleaning cloth and a pair of wire snips are a welder’s best friends. Your welding wire stick out should be a consistent 10-15mm and you’ll often find you have too much. Keep your snips to hand to get your wire to the right length.
As you’ll have read in our blog on common welding issues, dirt in the welding nozzle can cause all kinds of problems, so keeping it clean is critical.
And the same goes for your welding area. Make sure it is clear before you start and reduce the potential for contamination as much as possible.
Finally, let people know you’re ready to weld—then get going!
Watch our series of films – An Introduction to MAG Welding – for more hints and tips to help you weld safely, get the best possible results as well as save you time and money.
Over the coming months, we’ll be adding more tips and advice to improve your welding skills in our Welder’s Toolkit.
Please note: BOC accepts no liability for the incorrect choice of RPE and LEV. A correct risk assessment should be carried out to ensure suitable products are selected for the environment and user. Details regarding performance and limitations of products are set out on the packaging and/or user instructions

